Sunday, May 15, 2011

Jewelry Roll Up

Roll Up Jewelry Storage You Can Easily Make.
When I started making jewelry, I wondered how best to carry my jewelry to shows, boutiques, galleries and when traveling by air. I shopped around. I looked around. I asked other jewelry makers. I tried many suggestions and dreamed up a couple of solutions of my own. Today, I thought I would share the most recent form this quarry has taken. I hope you will benefit from what I have found to be a very easy and workable solution, an easy to make jewelry roll up.
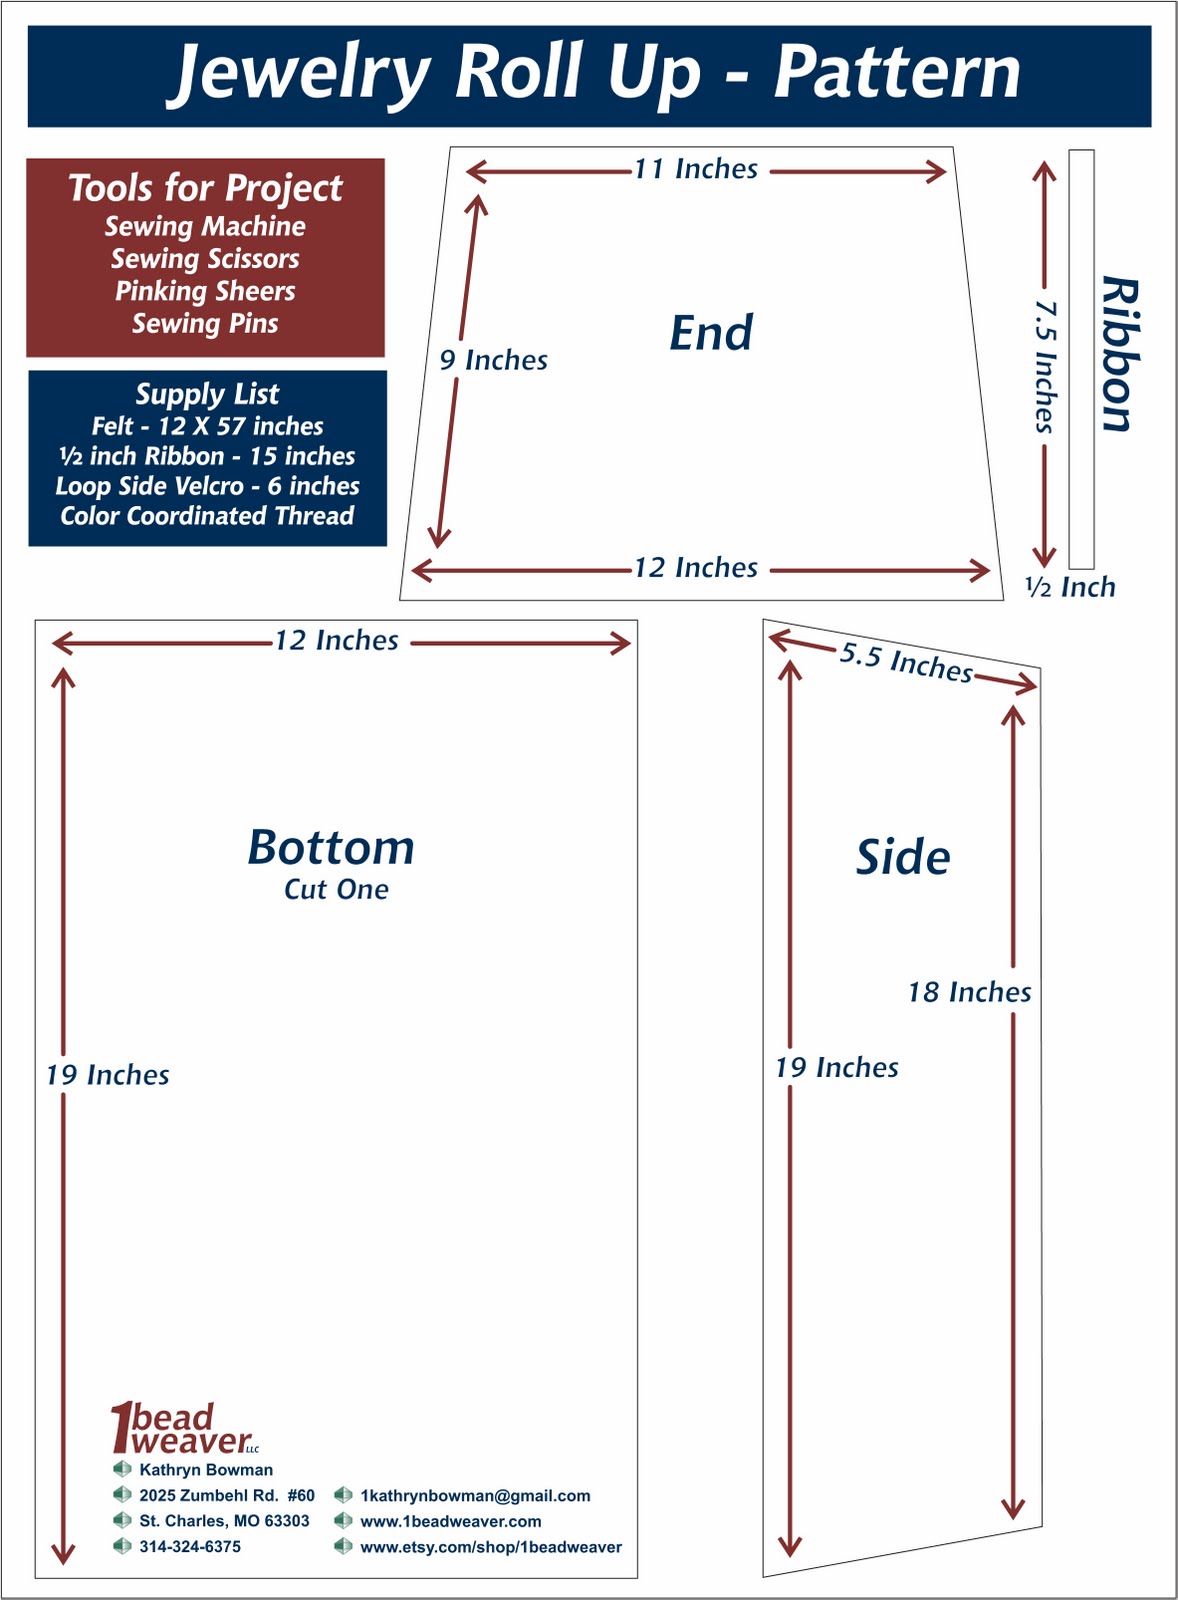
Free Roll Up Pattern
E-mail me @ 1kathrynbowman@gmail.com

You don't have to be an expert seamstress at all. In fact, all you need is a sewing machine or access to a sewing machine, little sewing experience, the fabric necessary, and a pair of scissors. What you will need:
  • Sewing Machine
  • Sewing Scissors
  • Pinking Sheers
  • Sewing Pins
  • Felt - 12 X 57 inches
  • ½ inch Grosgrain Ribbon - 15 inches
  • Loop Side Velcro - 6 inches
  • Color Coordinated Thread
1. Buy the fabric and thread. I've used felt and choose a dark color so the Roll Up wouldn't look soiled too quickly. In the previous version of the roll up I used felt and had stitched both the hook and loop side of velcro into place. After using the previous version for a while, I found that I only need the hook side of velcro. The hook side of velcro is the rough side and has tiny hooks. The hook side of the velcro will attach itself directly to felt fabric when rolled up. This eliminates a step for you.
2. Cut out the pieces. The last time I made Roll Ups, I went into production and cut out four. If you want a hard copy of the pattern, I have a free pattern in PDF form available for you by e-mailing me at 1kathrynbowman@gmail.com. Basically the bottom is 12 X 19 inches, long sides are 5.5 X 10 inches, and the short ends are 12 X 9 inches. On all of the side pieces cut one side a half inch narrower so that they will tuck in nicely when you roll everything up. You will need one bottom, two long sides, and two end sides.
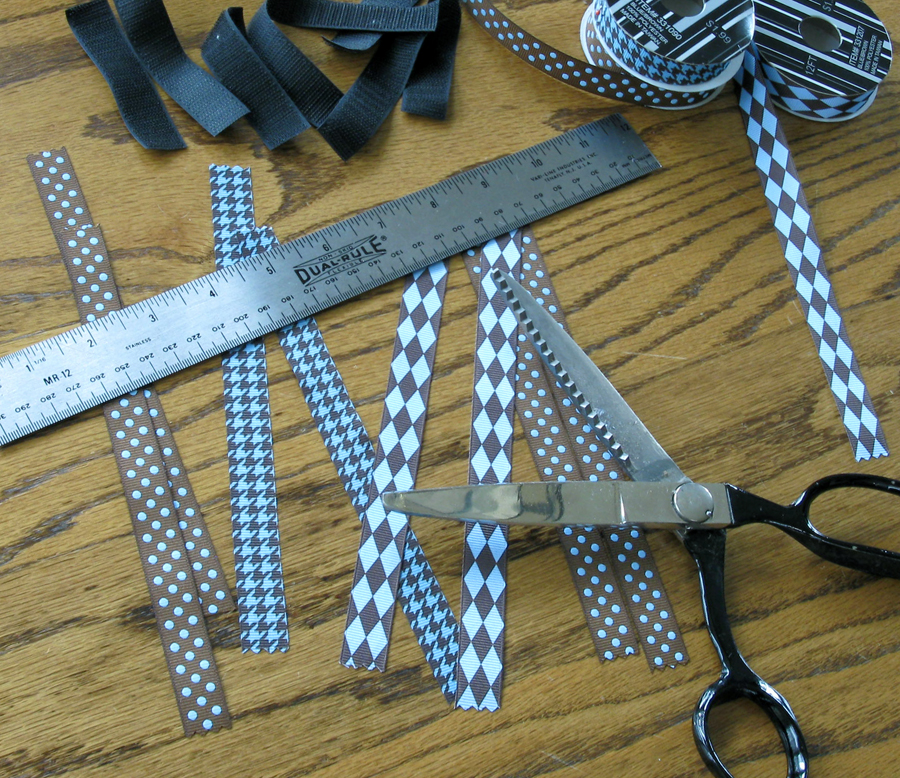
3. Cut Two 1/2 inch ribbon lengths of  7.5 inches with Pinking Shears. By cutting with Pinking Shears you will not need to finish the ends. I have found grosgrain ribbon will stand up to the wear the best. I hope for my current set of Roll Ups to last a while, so the length of wear is important. Grosgrain ribbon is the ribbed ribbon, with regular ribs going across side to side.
4. Cut Two 3 inch lengths of looped velcro.
5. Zigzag the the velro to one the end of the two Grosgrain Ribbons, by stitching around all four sides of the velcro and then one diagonal pass between two opposite corners. Pin the velcro to the ribbon in
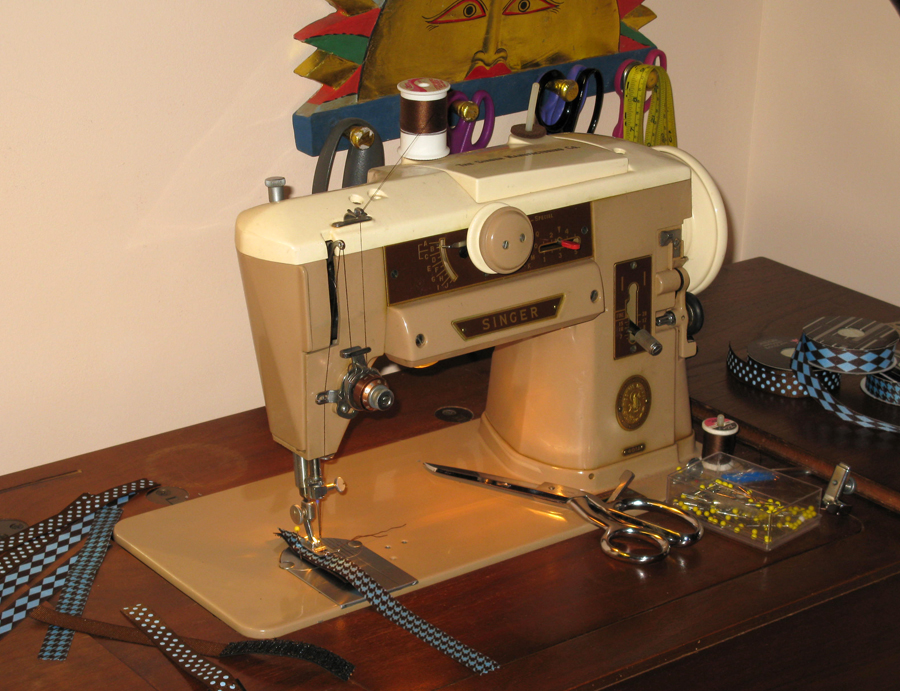
two or three places so they will not slip as you are sewing. Here you get to see my vintage sewing machine. I love this machine, I hope it never dies.
6. Start on one end of the bottom. Divide the end length into thirds and position the ribbon with the velcro ends in the two one third spots. Pin the ribbons to the felt end with the ribbon ends heading away from the bottom with the velcro side up. Over the top of where the ribbons are pinned, pin one of the short end sides to the bottom end and evenly match up the sides. Using a zigzag stitch, stitch right next to the edge all of the way across that end.
7. Stitch the other end to the bottom. Pin first and zigzag all of the way across.
8. Prepare to pin the long sides on by tucking the side of the end pieces away from the long side. This will keep you from inadvertently sewing the side of the end into the long side stitching. Pin the long side flap to the bottom and zigzag all of the way across. Repeat step #8 to attach the other long side.
     It's finish just that quickly. Now you can lay your precious creations in their carrier, fold first the short ends and then the long ends, and roll the end up heading toward where the velcro ribbons are attached. Once rolled up, bring the ribbons smoothly around and attach the velcro to the felt where they meet. These roll ups easily tuck into a carry bag, luggage, or into a safe at your hotel. I have found them to be convenient, my jewelry stays untarnish, and everything stays orderly. The Roll Ups make it easy to keep the jewelry organized by necklaces and bracelets.
     I hope you find these Roll Ups to be as useful as I have.

Thursday, February 24, 2011

Thinking About Warmer Weather

Flowers everywhere, I can't wait. I've always had a thing about flowers and they sneak into my work regularly. This piece was made during the snowiest time this winter in the St. Louis area. Does it have you thinking about spring? Being creative and infusing your thoughts and feelings into your work is so therapeutic.

Hand wire wrapped in Sterling Silver, the Rhodonite and
Chinese Crystal Beads create an asymmetrical
balance to a blast of pink flowers on the side.


Three Beaded Bead Flowers
created from Czech glass beads.


Sunday, December 19, 2010

Bead Jewelry Making Class Schedule

Jewelry Making Class Schedule


It's that time again. What will I teach for the next few months, do I have a sample for students to look at, do I have instructions written or ones I can easily adapt and when will I teach the classes. I doubt my potential students even give it a thought that there is much that goes into setting up a teaching schedule. And really why should they? This happens three times a year in my life for the bead store I teach for and once a year for the Bead and Button Show.

I teach at a bead store in St. Louis, Lady Bug Beads, and at the Bead and Button Show, every June in Milwaukee, and they set a deadline when they want all of my information, photos of samples to put on their web site, and the samples for jurying or in the store for display. I'm so glad to have a deadline. I do work on all of this in advance, but that deadline does give me the necessary push to actually get the samples made and figure out the schedule. I normally have classes scheduled to teach in my home as well. Right now I am in the middle of rearranging my studio and office arrangement, so that I have a little more room for my studio, better natural light for the studio and more efficient work space, so I am not going to schedule any classes in my home studio until March.

Each time I go through figuring out the schedule, I drag out my file with the lists from previous class posts over the past few years. I look through the file, thinking things like; is there a class I can resurrect, what has been popular, do I have anything new in the works? I make a big effort to add new classes each time. This keeps things fresh, while challenging me to figure out new work that my students will be interested in. In the end I come up with a list of seven or eight classes that I can rotate through the next four months or that I think the editors at Bead and Button think will sell for their amazing show each June.

Now the calendar gets pulled out. What holidays do I need to avoid? For example it doesn't work to schedule a class on Mother's Day. When do I have shows scheduled? Do I have meetings or family or friend events schedule? Does the bead store have any events on their schedule that I should avoid those days? A big red "X" goes through all of the days to avoid. With what is left over I start setting the schedule. For some reason, I really struggle with this. I wish I could figure out an efficient way to do this. I've got my calendar, I've tried spreadsheets, and it all still gives me a headache. Oh well, there is only about a day of angst.

All the while I am making the sample for each class or finding the sample I've used before. I need a great product shot of that sample, for the bead store, my web site, and Bead and Buttons catalog. And I need to write a compelling description to sell the class and a supply list for the students to go by before coming to class. That supply list can, quit often, be a bit of a challenge. Over the years I have accumulated a vast bead supply. When I make a design that entire world of beads will come into play. To make the supply list I need to name what each bead is, how many are needed and what tools will be necessary to preform the skills involved.


Finally, it does all come together. The whole process consumes me for about three or four days and that isn't making the samples. Depending on how many new classes I am planning, making samples will be going on for weeks. I'm always excited to deliver my new samples to the bead store or deliver my box of samples to the UPS Store for shipping to Bead and Button in Milwaukee. It is also a big sigh of relief when I type the last class description into my web site. I don't think about the whole process for a week or two, but then I'll have an idea for a new class and the process has started all over again.

It's all well worth it. Between Thanksgiving and through the middle of January I don't schedule any classes. No one signs up for classes, because they are so busy with family and friends. That first class I teach in January, I always find myself getting really excited. It's good to be back teaching how to make jewelry. I've always said there is a drug in beads and the zen of working with metal can't be described, so there are always students interested in the many techniques involved in the process of creating human adornment. For this I am grateful.

My schedule is now posted on my web site, 1 Bead Weaver. Lady Bug Beads is now in finalizing their list of classes that go through May. Lady Bug has six permanent teaches and various visiting instructors, either local or from out of town. Sign up for classes at the Bead and Button Show started on January 11 and my classes are already half full. I'm lovn' that. So see you in class!!!!!

Monday, August 23, 2010

A Small Rant About Color

I know this is really no big deal, but it intrudes into my creative world, time and time again. Do you identify red and green as exclusively Christmas colors? And what about black and orange, are they delegated to Halloween? You are not unusual if you said yes to both of those questions.

The other day I sorted out a few of my jewelry pieces to take apart or remake into something other than it's existing form. Hey, I'll never say that everything that I make is a stellar success. When a piece has hung around for a while I either take it apart for it's parts or remake it into what I hope will be a treasure for some fine lady. In my sorting, there was one piece that I really liked when I made it and still know it's quite nice, but for it's colors. It is a pale translucent green and true red. Ladies have tried it on, many have been drawn to it, but it just hasn't sold. There are those that have come right out and said, "Oh, Christmas." At a point it's not too hard to figure out what people are thinking. To me it isn't Christmas at all, but a great summer necklace.

I've had to acknowledge that the great marketeers that have gone with red and green for our traditional Christmas colors have won. Actually, there is a long history about why red and green have become the colors of Christmas and if you are interested, here is one link. That combination, no matter the shade variation that you try, is just going to mean Christmas to a majority of the Christian population. Orange and black for Halloween falls in this marketing victory as well as a combination of pastels that brings out the comparison to Easter. This all comes down to my not liking to live within limitations when it comes to color usage. It's not a big problem, just a small aggravation that won't go away in my life time. Color rocks!

Thursday, June 3, 2010

Creating a Jewelry Bead Kit

When you purchase that neat package with a beautiful photo of the beading project of your desire, did you ever think how that all came together? All of the beads are lined up in marked packets ready for you to play with. The instructions are numbered and sequenced for you to follow to completion and, ultimately, you putting on a piece of jewelry to show off to your world. It is quite an adventure to bring that self-contained entity, the Jewelry Bead Kit, together and I am going to share with you how I go about the process.

How does it start?
It all, of course, starts with the actual jewelry piece. In my life, there is jewelry being made all of the time. In fact, there are several projects going on at once. I make all of my jewelry with the best beads and findings to produce a quality piece for sale at a show or in a boutique or gallery. I don't make any of this jewelry for the singular purpose of being a jewelry bead kit. There are always other inspirations at work when the original piece is made. Then once I've finished a piece, I wear it out for a test drive, and either a comment is made or when I look at this particular piece in the mirror it will strike me that it will be a great beading project.

Asking the hard questions.
At this point I really look at the necklace or bracelet with a critical eye and ask myself a few questions. Will the techniques in this piece be doable by the average beader? Are these colors too bright or should I calm them down? Are there too many techniques? Is this piece of jewelry truly unique? Are these beads or components readily available? Are these beads or components in a price range that will make the kit affordable? Thinking in this way, the necklace or bracelet will be re-made using more affordable or more readily available beads, possibly a simpler technique, and a slightly different color pallet.

Finding the best beads at the best price.
While I am re-making the piece, I'm already shopping for beads. I always look to find the best price available so the end kit will be the best price for you. I go to large bead shows and try to keep up with what is available. Over time I've gotten to know a few bead vendors that I trust and can depend on. I will go online and I dig deep, past the first few pages of a Goggle search and look and look to find the best prices. I may end up opening a new account for that good price. I'll make a small order and if that experience is good I'll know I can depend on this vendor.

Writing, rewriting, editing, and testing.
In reality, writing the instructions is the most time-consuming task in making a kit. Most of the kits I have produced are fairly complex with lots of steps. As I am writing, I'm thinking about whether an illustration or a photo will communicate the concept or steps the best. I will be working on the verbiage and the illustrations at the same time; to me they go hand in hand. I teach at a bead store here in St. Louis, so I am fortunate to be able to test my instructions on my students. Believe me when I say, they will let me know if it isn't working. I really listen to my students and am grateful for their input. This work on the instructions may take six months. Yes, that long. I always test my instructions in the real world and it's not like that will happen on a speedy time frame. It's all good. I think this makes it a better product and when it does get out in the world, the bugs are worked out for the most part.

"The" photograph.
By this time I may have made the sample piece four times and it's time to take the beauty shot. I set the jewelry up in an environment, flat on a table or possibly hanging. These photos will be used in many places and in different ways, so I try to anticipate all of that and take tons of pictures. They will be in the instructions, online in my website and on Etsy.com, maybe in a blog or as part of an article, as well, so the piece is turned about every direction to be able to give the information needed.

Now it is the moment of truth, you are at a show and you are debuting this awesome kit. The people start stopping and looking at your kits. They touch, they feel, they make comments and ask questions. And, yeah, they buy one. After all of the effort it is so rewarding the someone really will hand you their credit card and make that purchase. They no doubt are clueless what has gone on before their being able to walk away with that kit in the cute little shopping bag, and you know what? That's O.K. So you see, it is quite an adventure creating a Jewelry Bead Kit and getting it to market, but always fun in the process.


The kit in the photos is my most recent addition to my line of Jewelry Beading Kits. You can find it online at http://www.1beadweaver.com/.