
 Do you need a quick jewelry display to feature one of your most excellent pieces? If you only need one, this can be finished in an hour, tops.
My jewelry is currently in a juried gallery show in St. Charles, IL, Molten Glass and Metal Show, running January 11 through February 15, 2014. For that show, they requested display items, to best show off your work. I've always bought commercially available jewelry display items and then recovered them with a taupe faux suede fabric. This created a distinctive look, yet understated to show the jewelry off .
The bracelet displays I had been using were a half round that displayed two or three bracelets comfortably. For this show I thought is would be nice to showcase the bracelets and brooches that I was sending individually. What to do . . . ? I thought it would be interesting to have cylinder pedestals at different heights. The local sources I visited didn't have what I had in mind. I did remember, however, that I had seen round gift boxes at the "dollar store". I got two heights and got busy covering them with my signature fabric.
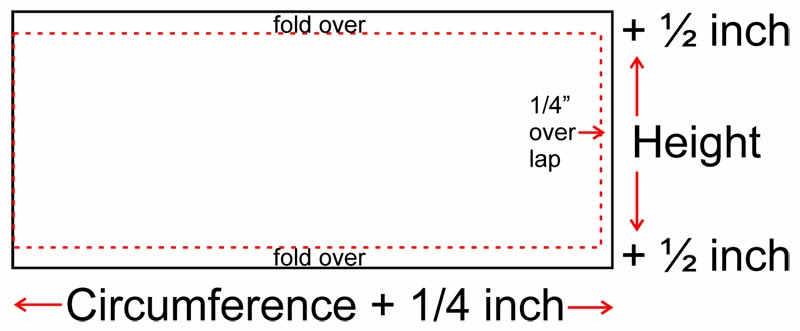
First I made a pattern. Really I did my measurements and cut directly into the fabric. For you I have made a pattern that you can copy onto paper and adapt to your specific measurements.
Tool List:
- Scissors, Ruler, Tape Measure, Exacto Knife, Pen, Pencil
Supply List

- Round Box
- 1 Yard of Fabric, probably much less. If you are covering one box, a scrap will be large enough.
- Spray Glue - 3M General Purpose
- Card Board - 1mm thick
 Turn the covered box bottom side up. This will now be the top of the display cylinder. We will now create a cover for what was the bottom of the box. Using the box as your pattern, draw around the box onto the 1mm card board. Cut the card board circle out. Draw around the card board circle onto the back of your chosen fabric. Free hand draw another line 1/2 inch from the line you just draw around the box. Cut the fabric circle out. Cut 1/2 inch straight slit notches about a half inch apart all the way around the fabric circle.
 Spray glue on the back of the fabric circle and the card board circle. Carefully position the card board circle into the center of the fabric circle, and glue down. Fold notched tabs over to the back of the card board, one at a time. Glue to the top of the jewelry display.
For those of you that have done this type of fabric covering, this brief how to will have you on your way. I want to give you detailed instruction, and have written a four page PDF file for those of you that need a little more information. In the download there are loads of photos and step by step instructions from start to completion. You can purchase the PDF download at my Etsy Shop or on my 1 Bead Weaver web site.