How do you make jewelry when you are on the road? If you are like me, I can't stop making. There can be many reasons. I may be making a sample for a new class, there might be a art show in my not too distant future, I might be experimenting with a new design, and the reasons can go on and on. But right now in my life, I need to be making jewelry for the simple reason of sustaining my jewelry making business. Because of this when I take a trip for business or pleasure I have devised ways to
to take it all along. Fortunately I love my work and really isn't ever completely about work. I may have a deadline, now and again, but I'm always having fun.

So you are going to benefit from my efforts to figure out what works and what doesn't. As a metalsmith, it is pretty obvious that it is impossible to work on the road, unless you are visiting another metalsmith that you have a pretty good relationship with, and that will allow you to work in their studio. Put simply a metalsmith needs tools and a work space. So I get all of my metal components for my projects finished before I head out. On the road I work on my beadwork or wirework. Everything packs up small and is really portable. This requires packing tools, supplies, and a work space.
Tools for beading are pretty simple, scissors and a few needles, done. Wirework is tool intensive, and for that I take three pliers, wire cutters, a file, tweezers, a crimp pliers, and a crochet hook if I bring a crochet project.

I have found a travel pouch that is the length of the longest tool and has a zipper all round on the top with easy access. In the lid is an inside zippered pouch that I can tuck a finger file, the file handle, and the crochet hook. Take you time in find the ideal pouch. It's out there. This one that I am using was described as a shaving kit.
If you are worried about carrying tools on an airplane, here is the link to the
TSA (Transportation Secruity Administration) Traveler Information page. You can carry pliers, scissors less than four inches long, and a finger file. Now if I were to leave the finger file in the handle I have for it, I could not carry it, because sharp objects can be no longer than seven inches. With the existing rules today, I'm good if I take the file and handle apart. In talking with my students over the years since 9/11, there is an amazing amount of confusion about what an airline passenger can carry on the plane. If you are in doubt, it is very easy to find out before you head to the airport and feel secure about what you are carrying with you. If you are really in doubt, put that item in your checked bag and it will be waiting for you at your destination. For heavens sake, you can put a hatchet in your checked baggage. If you are totally paranoid, ship the questionable item UPS to your destination. It has been thirteen years since 9/11 and we need to update our thinking about travel and what we
can carry. Things have changed a lot since that tragic day. Stay current with a quick visit to the
TSA site. Oh and, scroll down on the page, it is a long page. That way you will get all of the information you need.
Part of getting my outfits all together for my trip, is also put together my jewelry making projects. "Travel Kits" we will call them. I have learned over time that I really only need enough Travel Kits to keep me busy for the actual travel time, the flight time and the sit around time, and maybe one more if there happens to be a delay. (Yes, they do happen.) When I reach my destination you will be too busy visiting, eating, touring, or working, if you must, to be sitting around making jewelry. All of the Travel Kits go into another pouch along with any findings I anticipate I will need for the projects. I see ladies pack boxes and boxes of beads for a trip, because they can't decide what they want to work on. I say keep it simple, lighten the load, and take the time to create Travel Kits. Added bonus, when you get home you have all of the projects organized to keep working with no fuss.

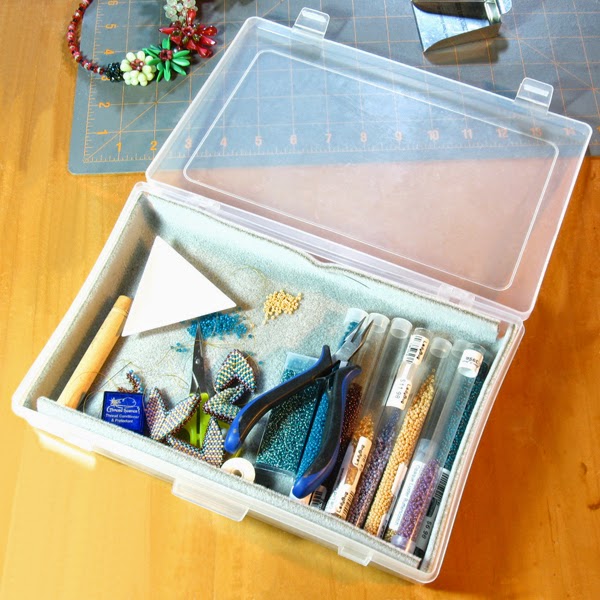
So this adds up to a pouch for tools, a pouch for Travel Kits, and a plastic box with a latching lid that will double as your work area. The plastic container that I have found is 11 inches by 7 inches, and is 1 3/4 inches deep. This is the third plastic container I've tried, and this one is a keeper. Once you have found the ideal container cut a bead mate to fit the interior of the box. I simply cut a square out of each corner and tucked the bead mat inside. The sides fold upward all of the way around the box. The best "surprise thing" about this box I am using, is the lid will snap off while I'm working, making the box easier to fit anywhere as I work. The lid can double as a place to contain all of your supplies, but out of your way. When working on the tray table on the plane and the guy by the window wants out, just close the lid, stand up, let him out, and continue beading until he gets back. Don't even need to miss a stitch.
I'm aware there are many products available for travel and the jewelry maker. I'm not trying to be in
competition with any of that. These are my low tech. solutions for keeping it simple. I hope you have picked up a tip or two. The travel box and pouches fit easily in my carry on when traveling by air. If I'm taking a
road trip, all of this works well too. In fact, I love a road trip when I don't have to drive. For me it's a "beader's perfect storm." After years of traveling (in my past life I was a flight attendant for 33 years.), I'm at a point where I try to drag as little as possible around and still have all I need to entertain myself, and pass the time if need be, on the road. If you have any great travel solutions, add them in the comments below. It's always fun to hear what great ideas other people have come up with.

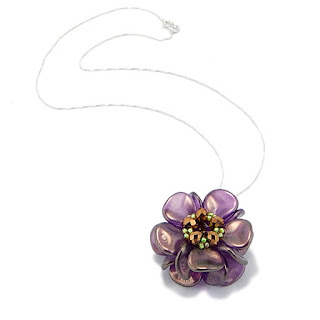
 The Petals Petals Petals pendant/brooch was created last
spring. It started out as a pendant.
Then I thought, oh, this would make an awesome brooch. Well it has been a bit
of a journey to get the pendant/ brooch aspect really working.
The Petals Petals Petals pendant/brooch was created last
spring. It started out as a pendant.
Then I thought, oh, this would make an awesome brooch. Well it has been a bit
of a journey to get the pendant/ brooch aspect really working. First I purchased a
pin back that is commonly available. I wasn’t thrilled with its design. It
could
First I purchased a
pin back that is commonly available. I wasn’t thrilled with its design. It
could
 I started creating
the various parts for the pin back. I would need a base plate for the top,
which I punched three holes into. The holes would accommodate sewing the base
onto the finished Pendant/Brooch. To this base I soldered a spiral of wire that
I interrupted in the center with a portion of the wire reaching up to create a
bail and then returning to continue making the spiral. Through the center of
the spiral the actual pin back would run and bend down on each side. For the
bottom portion of the pin back I created a length of metal, punched three holes
evenly, rounded the ends, and rolled the ends over.
I started creating
the various parts for the pin back. I would need a base plate for the top,
which I punched three holes into. The holes would accommodate sewing the base
onto the finished Pendant/Brooch. To this base I soldered a spiral of wire that
I interrupted in the center with a portion of the wire reaching up to create a
bail and then returning to continue making the spiral. Through the center of
the spiral the actual pin back would run and bend down on each side. For the
bottom portion of the pin back I created a length of metal, punched three holes
evenly, rounded the ends, and rolled the ends over.
 I
am so pleased with the result. When stitched in place with nylon filament, the
result allows the pendant to ride close to the body or pin snugly to a jacket
or sweater. No tipping over. The bail portion leans away from the body in-between two
of the petals. When worn as a brooch the bail is hidden by a petal. When worn
as a pendant the pin back rides out of sight. I am so grateful
that I have the metalsmithing skills to create a solution like this. For those
of you with similar skills, you may find this to be a great solution for your
next beaded project.
I
am so pleased with the result. When stitched in place with nylon filament, the
result allows the pendant to ride close to the body or pin snugly to a jacket
or sweater. No tipping over. The bail portion leans away from the body in-between two
of the petals. When worn as a brooch the bail is hidden by a petal. When worn
as a pendant the pin back rides out of sight. I am so grateful
that I have the metalsmithing skills to create a solution like this. For those
of you with similar skills, you may find this to be a great solution for your
next beaded project.
 If you are interested in making the Pendant/Brooch "Petals, Petals, Petals" I have posted the PDF in my 1 Bead Weaver Etsy Shop.